In today’s digital age, a robust and reliable internet connection is essential for seamless communication and entertainment. Installing home Ethernet is an excellent way to enhance your connectivity, offering faster speeds and greater stability than Wi-Fi. This guide will walk you through the steps to easily connect and install Ethernet in your home, ensuring you can enjoy uninterrupted streaming, gaming, and browsing. Whether you’re a tech-savvy homeowner or a DIY enthusiast, our comprehensive instructions will empower you to efficiently set up Ethernet, transforming your home network into a high-speed data haven.
Brief Overview
Installing home Ethernet significantly enhances your internet connectivity by providing a stable, fast, and reliable network ideal for modern households. Unlike WiFi, Ethernet offers consistent connectivity, reducing interference and latency, crucial for activities like streaming and gaming. This comprehensive guide covers everything from planning your network layout to executing installations through walls and ceilings, ensuring robust home networks. By utilizing tools like keystone jacks and crimping tools, and considering future expansions, you create a scalable, future-proof system. Troubleshooting advice guarantees maintained connectivity, with backup solutions providing additional network reliability and continuity.
Key Highlights
- Home Ethernet setups offer stable, interference-free networks, perfect for streaming, gaming, and smart homes.
- Ethernet installation enhances security and minimizes latency, crucial for video conferencing and online gaming.
- Including keystone jacks in your setup simplifies network expansion and maintenance over time.
- Planning Ethernet layout involves careful mapping and future-proofing for optimal performance and connection flexibility.
- Backup connections prevent downtime, ensuring continuous access through dual-WAN routers and varied ISPs.
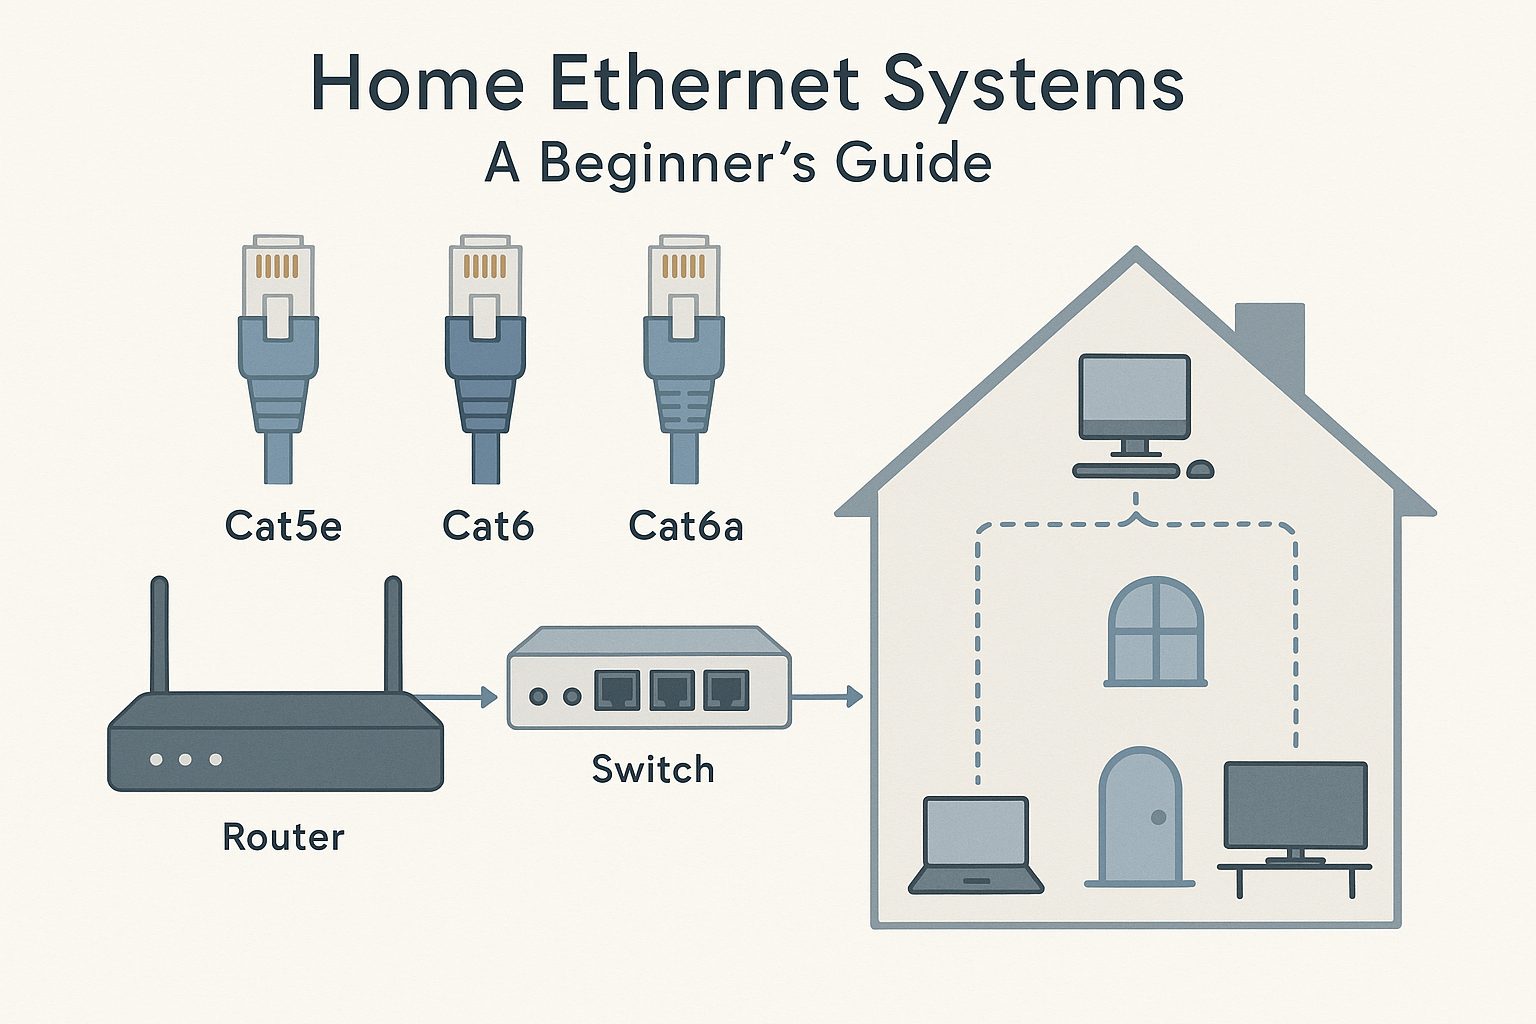
Understanding the Basics of Home Ethernet Systems
Setting up a small residential wired network with Ethernet cables in your house promises not just improved stability, but offers a reliable alternative to traditional WiFi setups. Ethernet networks provide consistent connectivity throughout your home, reducing the common interruptions associated with wireless networks. They are particularly beneficial for anyone wishing to run a house full of connected devices without signal loss or interference. Understanding how Ethernet installation transforms your home connectivity is essential before diving deep into the technicalities. Let’s explore how the basics of home Ethernet systems can enhance your daily life by making your connectivity seamless.
| Advantages | Challenges Addressed | Impact on Home Value |
| Faster Internet Speeds | Poor Wireless Signal | Higher Market Appeal |
| Reliable Connections | Network Congestion | Increased Resale Value |
| Improved Security | Interference Issues | Modernized Infrastructure |
This table encapsulates the transformative impact of adopting Ethernet networks in enhancing home connectivity while addressing common wireless issues and boosting property values.
Benefits of Installing Ethernet in Your Home
Adopting a wired Ethernet setup in your home can significantly boost connectivity stability, making it an attractive option for many homeowners. Unlike WiFi, which can suffer from interference from walls and other devices, Ethernet cables provide a steady, reliable connection that can handle multiple devices simultaneously without a hitch. If you’re someone who frequently streams high-definition content, participates in online gaming, or manages a smart home environment, the investment in Ethernet installation is undoubtedly worth considering. This ensures that every part of your house is equipped with fast, uninterrupted internet access, something harder to achieve with a WiFi-only setup.
Ethernet cables inherently reduce latency, a critical factor in enhancing online experiences. Latency issues can be particularly frustrating in applications that require real-time input, such as video conferencing or gaming. By opting for Ethernet cables over WiFi, you minimize these delays, resulting in smoother interactions and enhanced productivity. Moreover, Ethernet’s inherent security benefits are worth noting. Wired networks are generally harder to intercept than wireless counterparts, reducing the risk of unauthorized access. This security advantage makes Ethernet installations especially appealing for those dealing with sensitive information or data-intensive operations.
Not only do you gain in terms of performance, but Ethernet cable setup can also simplify network management. With Ethernet, there’s less to troubleshoot in terms of connectivity problems, wired connections eliminate many variables that can plague WiFi, such as signal interference or range limitations. These issues commonly lead homeowners to spend unnecessary time trying to boost WiFi signals and manage multiple extenders. With an Ethernet network, once the cables are laid and the network is set up, consistent performance is a promise, not an aspiration.
Transitioning to a wired network in your home also increases the overall market value of your property. An Ethernet-ready home is a feature many modern buyers find attractive. It assures them that the home is equipped with robust, up-to-date technology infrastructure, enhancing its appeal in a competitive market. Moreover, an Ethernet network often requires fewer routers and boosters, allowing you to set up your home network on a smaller budget in the long run. With costs of routers and extenders frequently adding up, investing in Ethernet installation offers a cost-efficient alternative.
With this overview, it becomes clear that the advantages of upgrading to a wired network are extensive. From delivering high-speed internet throughout your home to enhancing security and having potential financial benefits, Ethernet installation is an effective method to future-proof your house against the growing demands of digital living. By understanding and appreciating these benefits, you are already on your way to transforming how you connect to the digital world from your home.
| Feature | Benefit | Impact | Additional Notes |
| Stable Connectivity | Consistent internet speeds | Reduces lag and interruptions | Ideal for gaming and streaming |
| Enhanced Security | Secured wired connections | Minimizes unauthorized access risks | More difficult to hack compared to Wi-Fi |
| Cost Efficiency | Reduces long-term expenses | Less reliant on wireless updates | Initial installation may be higher than Wi-Fi setups |
| Future-Proofing | Supports growing data demands | Prepares home for new technologies | Easy to upgrade as technology evolves |
This table highlights how integrating Ethernet into home networks not only enhances connectivity stability but also offers security, financial benefits, and future-proofing, catering to the evolving demands of digital living.
Why Ethernet Installation Is Right for You
When weighing the decision to install Ethernet in your home, a myriad of factors emphasizes its importance, making Ethernet installation an appealing project for the modern household. One of the foremost reasons people opt for Ethernet is the control and customization it offers over their home network. Unlike WiFi, where signal strength can fluctuate throughout your house, a wired setup ensures each area receives consistent, high-speed internet, perfect for heavy internet users or those running a small residential wired network.
By choosing Ethernet, you are effectively enhancing your home’s network infrastructure. This is extremely beneficial if your house is already filled with devices that demand stable connections, such as smart home systems and streaming solutions. An Ethernet installation is also advantageous if you often undertake bandwidth-intensive activities, whether they’re professional or personal. Uploading large files, engaging in lengthy video conferences, or using cloud storage becomes seamless, a boon for those who work from home or have high data demands.
Beyond performance advantages, an Ethernet network can save you from hidden costs often associated with WiFi networks. With WiFi, users frequently purchase additional equipment like signal boosters or extenders to maintain quality across larger homes, but a well-laid Ethernet network eliminates this need, reinforcing consistent connectivity from the outset. Additionally, it offers better speed due to direct cable connections rather than dealing with signal variations and interferences present in wireless systems.
The installation process, though upfront in cost, is an investment worth making. As technology evolves, homes that accommodate modern connectivity standards are more appealing in the property market. Having an Ethernet setup signifies that your property is ready to handle future technological integration with ease. Moreover, the material benefit of having fewer devices prone to overloading or dropping off the network can be a substantial relief. Homeowners can set up media servers, online gaming systems, and workstations with confidence, ensuring each device gets the required bandwidth without hiccups.
Finally, the predictability of Ethernet versus the unpredictability of WiFi is another strong point in its favour. For instance, if your work or lifestyle requires a consistent connection that simply cannot afford to lapse, Ethernet offers that peace of mind, delivering content and communications at optimal speeds reliably. As connectivity becomes more critical, laying the groundwork with Ethernet ensures you’re not left behind as demands increase. From improved personal productivity to greater entertainment value and technological preparedness, choosing Ethernet when installing or updating your home network is a future-proof decision.
| Benefit | Considerations | Cost | Installation | Performance |
| Reliable Connection | Cabling Constraints | Initial Setup Cost | Professional Installation Recommended | High Speed & Low Latency |
| Consistent Speed | Limited Mobility | Long-term Investment | Complexity with Existing Structures | Stable for Streaming & Gaming |
| Low Interference | Potential for Outdoor Limitations | Budget Considerations | Time-Consuming Setup | Excellent for Large Data Transfers |
| Secure Network | Requires Additional Hardware | Possible Incremental Upgrades | Need for Professional Cabling | Ideal for Smart Home Integration |
This table summarizes the critical aspects to consider when opting for home Ethernet systems, highlighting their strengths in providing reliable and high-performance connectivity in modern households. As digital demands grow, Ethernet offers an advantageous alternative to WiFi, ensuring robust network performance crucial for smart home technology, consistent streaming, and secure data management.
Essential Tools for Ethernet Installation
Setting up Ethernet in your home can revolutionize your internet connectivity by providing a reliable and fast network. To achieve this, you’ll need some essential tools that will not only help streamline the process but also ensure that the installation is durable and efficient. From selecting the right ethernet cables to knowing how to use a crimping tool or including keystone jacks, having the correct tools is crucial. This guide will take you through using ethernet cables and connectors and incorporating keystone jacks into your setup for a seamless installation.
A Guide to Using Ethernet Cables and Connectors
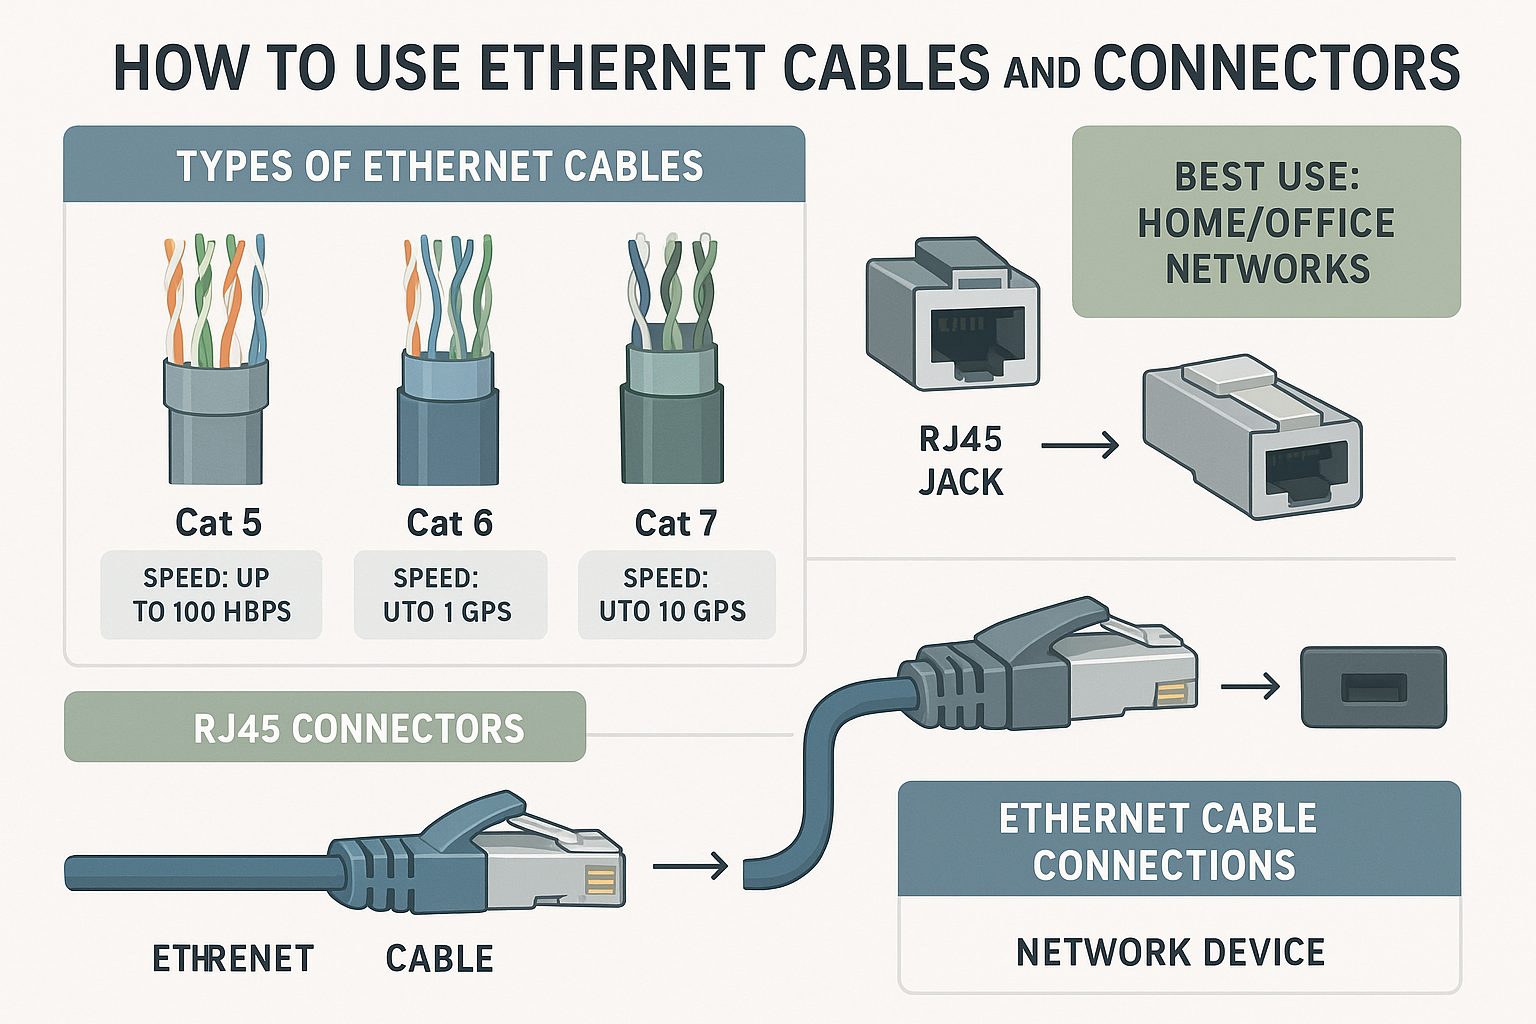
The backbone of any home Ethernet installation is the ethernet cable. When choosing cables, it’s important to understand their specifications. Most home networks will benefit from Cat6 cables, which offer an excellent balance between speed and cost. Cat6 cables can support up to 10 Gbps of speed with a bandwidth of 250 MHz, making them adequate for high-usage households. However, for future-proofing, you might consider Cat6a cables, which support up to 500 MHz bandwidth. Picking the correct cable is essential, and you should keep in mind that the thicker the cable, the better the data transmission over long distances and multiple connections.
Besides cables, connectors cannot be overlooked. An ethernet connector, or RJ45 connector, attaches to the cable’s end, allowing it to connect to devices like a router or wall jack. Using a high-quality crimping tool, you can attach connectors to the ends of cut cables, ensuring a secure fit. When crimping, be careful to follow color-coding standards such as T568A or T568B to prevent connection issues. A poorly attached connector is likely to result in poor connection quality or complete network failure.
Investing in a cable tester is wise for anyone installing an Ethernet network. This tool allows you to verify that your cabling is correctly wired and operational, sparing you from frustrating troubleshooting sessions later. Wireless network setups often suffer from interference issues that a reliable Ethernet installation will negate. Therefore, an ethernet cable tester is an essential inclusion in your toolkit, offering peace of mind and ensuring installation accuracy.
Also worth mentioning is the use of patch panels in managing connections, especially for larger setups. A patch panel allows easy reconfiguration of network connections without re-cabling the entire network every time there’s a change. While not absolutely necessary for smaller installations, for expansive or technically demanding networks, a patch panel offers organized cable management and simplicity in ongoing maintenance and adjustments.
The correct tools, such as a drill for creating access points through walls and a data switch for managing different connection points, are vital as well. A data switch efficiently routes data flow across your network, minimizing latency and improving overall network performance. Ethernet cables and connectors form the core of infrastructure, but these associated tools ensure the setup is comprehensive and resilient. Remember, taking the time to properly select tools and prepare before installation can greatly impact your network’s success and longevity.
| Tool/Component | Purpose | Best Practice | Benefits |
| Ethernet Cable Tester | Verifies cable functionality | Test all cables after installation | Ensures proper connections and reduces downtime |
| Cable Crimping Tool | Attaches RJ45 connectors to cables | Use high-quality connectors | Improves connection reliability and signal integrity |
| Network Switch | Connects multiple devices | Strategically place for optimal coverage | Enhances network performance and scalability |
| Cable Management Tools | Organizes cables | Use labeled and color-coded cables | Facilitates maintenance and troubleshooting |
| Patch Panel | Centralizes cable connections | Securely mount in rack systems | Improves organization and scalability |
This table provides an overview of critical tools and components essential for an efficient Ethernet installation, showcasing how best practices enhance both functionality and longevity of the network setup.
Including Keystone Jacks in Your Setup
Keystone jacks play a critical role in professional and home Ethernet installations by allowing cable termination in wall outlets, making a neat and organized network environment. These jacks are designed to fit into a wall plate or patch panel, providing a universal standard for connecting ethernet cables to home networks and devices. They not only enhance aesthetics but also protect your cabling, ensuring durable connections that won’t degrade easily.
Installation involves cutting your ethernet cable to the desired length, stripping the outer insulation to reveal the inner wires, and then inserting these wires into the keystone jack according to the appropriate wiring scheme, either T568A or T568B. This stage is crucial, using a punch-down tool will help you seat the wires firmly into the jack. A correctly seated keystone jack ensures a secure connection and minimizes the risk of connection issues. Therefore, invest in a high-quality punch-down tool to make this task easier and more reliable, ensuring connectivity through proper seating of wires within the jack.
When designing your network setup, consider the position and number of ethernet ports you’ll need in each room. With careful planning, you can strategically place wall jacks using keystone jacks, providing connectivity points where you need them most. If your house is large, having multiple access points ensures that network devices are within reach of an ethernet connection, enhancing overall network performance. Implementing cable management solutions such as trunking or conduit tubes will help keep cables organized, prolonging their lifespan and keeping your installation neat.
Keystone jacks also simplify maintenance and future expansions. If there’s ever an issue with a wall jack or if you decide to expand your network by adding more devices, a keystone jack setup allows easy reconfiguration without unnecessary rewiring. This flexibility is invaluable, particularly in dynamic home environments where technology and connectivity needs evolve over time. Additionally, consider adding a patch panel to your setup, allowing central management of all connections to further streamline network administration.
Finally, it’s essential to address common issues you might face with keystone jacks, such as the need for higher-grade jacks if you’re planning to run cables over long distances or through potentially interference-rich environments, like those close to electrical wiring. Choosing shielded keystone jacks can enhance performance by reducing interference. Overall, the inclusion of keystone jacks in your Ethernet installation process not only simplifies connectivity at each endpoint but reinforces a robust network framework that can grow with your technological needs.
Step-by-Step Guide to Installing Ethernet Cabling
Installing ethernet cabling in your home involves thoughtful planning and the right tools. This detailed guide will cover how to effectively plan your layout, and execute installation through various structural challenges in your house. The process may seem daunting, but with proper guidance, you can enhance your home’s connectivity and enjoy a stable, fast internet connection through professionally installed cabling. Let’s explore the crucial steps in setting up your home for a seamless wired network.
Planning Your Ethernet Installation Layout
Before you embark on an ethernet installation, planning your layout is crucial to ensure every area where a connection is needed gets covered. Start by identifying all the locations where you want to have ethernet ports, such as in living rooms, home offices, or entertainment areas. Assessing your home’s current setup will determine where each ethernet port would best serve your internet needs. Plotting out the layout ahead of time not only saves effort but also minimizes future connectivity problems. Planning the cable run is important, considering distances and obstructions like doors or walls that could affect cable integrity.
Once you’ve decided on the port locations, you’ll need to create a detailed schematic of your installation layout. A schematic acts like a blueprint for your cable run to ensure you don’t skip any vital aspects of the network. Your layout plan should take into account the distance limitations of ethernet cables, such as the 100-meter restriction of Cat6, and how you will navigate obstacles like walls or support beams. Remember, a clean and efficient run significantly affects network performance.
Plan the most effective routes through walls or ceilings, taking advantage of existing infrastructure like ducts or under-floor spaces, which facilitate easier installation. Optical inspection devices like borescopes can help you see inside walls and ceilings without demolishing them, saving both time and effort. Mapping these routes ensures you know exactly where you’ll need to use a drill for creating holes, while keeping the installation seamless and less disruptive.
Don’t forget to ensure that your layout incorporates future-proofing considerations. As technology advances, your data demand will likely increase; having a flexible and scalable network will prevent frequent overhauls. You may also consider integrating a network switch or patch panel into your design to boost connectivity options and simplify network management. These components can handle various connections, allowing multiple devices to be easily added or moved without extensive rewiring. Cater to variability by pre-installing additional ports in areas that might have their usage needs evolve in the future.
Once your layout is adequately planned, you’re equipped to source the materials and tools needed, such as adequate lengths of ethernet cable, RJ45 connectors, a cable tester, and mounts or brackets for securing cables to your home infrastructure. Taking these preparatory steps will smoothen your move into the physical installation phase, keeping the future of your network in mind and ensuring your investment remains beneficial for years to come.
| Step | Action | Tools Needed | Considerations |
| 1. Planning the Layout | Identify device locations and best cable routes | Blueprint or floor plan, measuring tape | Account for distance limitations and avoid high interference areas |
| 2. Installing Through Walls and Ceilings | Drill holes and feed cables through | Drill, fish tape | Avoid structural damage and comply with building codes |
| 3. Securing Cables | Attach cables neatly and securely | Cable staples, zip ties | Maintain cable integrity and avoid sharp bends |
| 4. Finalizing the Installation | Connect to devices and test connectivity | Ethernet Tester, RJ45 connectors | Ensure all connections are secure for optimal performance |
This table succinctly summarizes the key steps and considerations in installing ethernet cabling, providing a quick reference for effective implementation.
How to Install Ethernet Through Walls and Ceilings
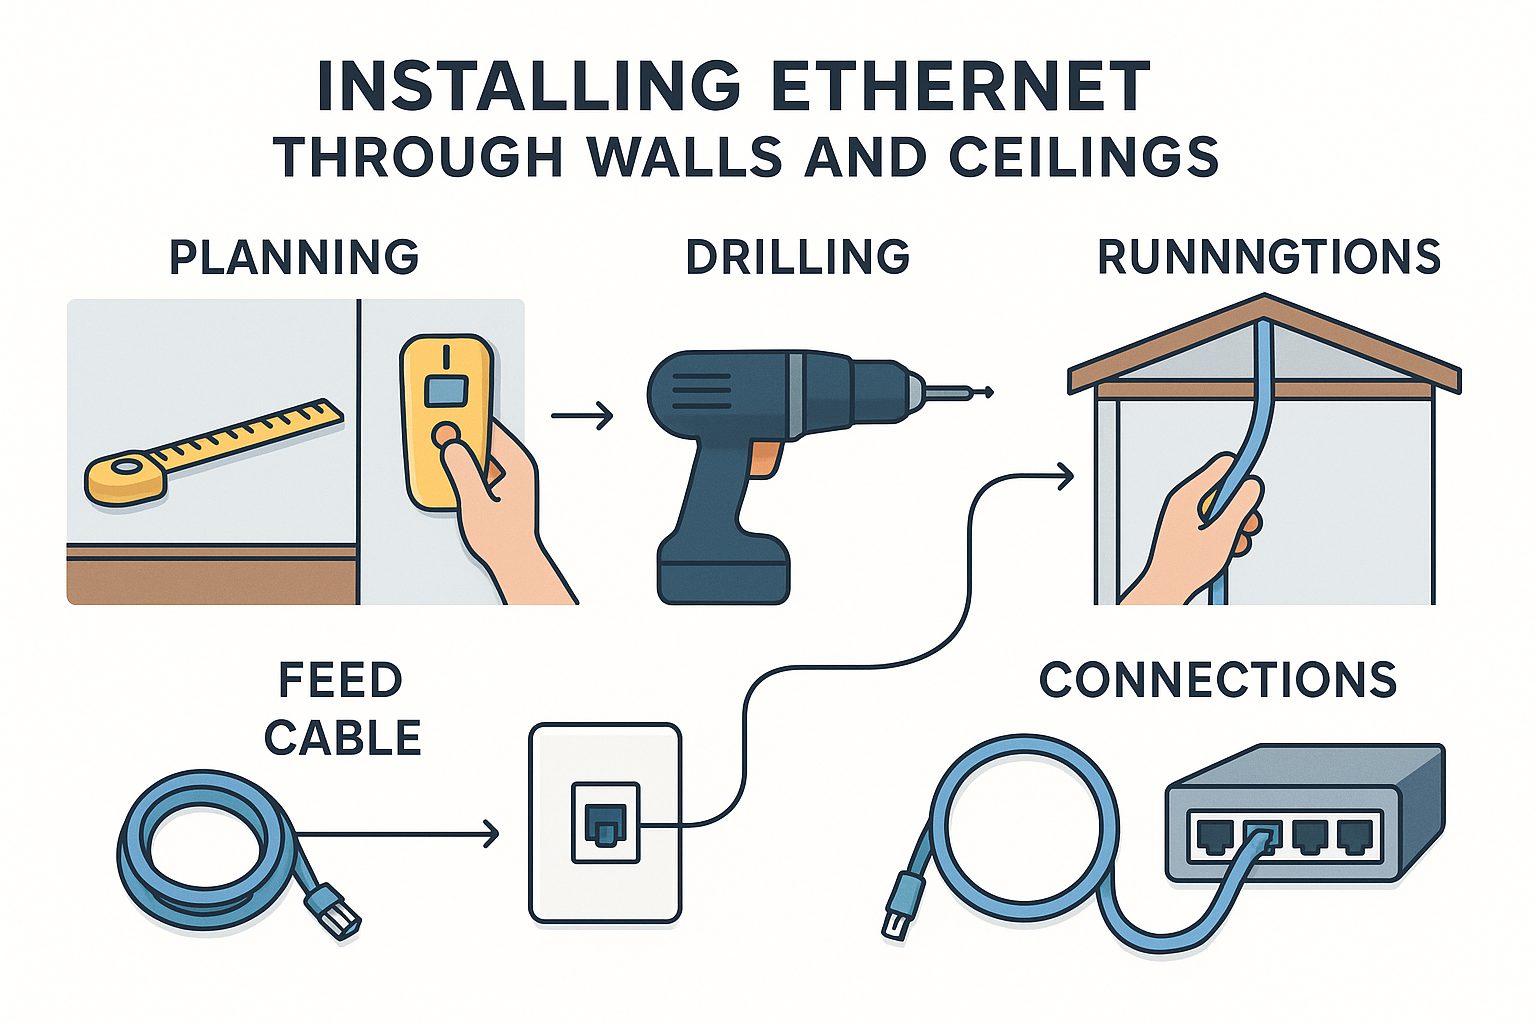
Installing ethernet through walls and ceilings might seem daunting, but with the right approach, it becomes manageable and rewarding. Begin by marking your planned routes on the walls and ceilings as per your layout plan. It’s important to avoid power lines to ensure the safety and efficiency of your installation. Use a stud finder to locate beams and avoid these obstacles during installation. Once mapped, use a drill to create access points through which cables will be run.
Carefully running the cables through walls and ceilings is crucial for maintaining a clean setup and preventing damage. Fish tapes or rods are invaluable at this stage, allowing you to pull cables through small apertures without harming drywall. If you face challenges such as floor joists, you may need to drill additional passage holes, ensuring minimal impact on the structural integrity of the building. Running cables through ceilings often necessitates special consideration for insulation, which can hinder cable placement if not carefully managed.
After threading the cables through your pre-drilled holes, securing them properly is essential. Cable clips or conduits are ideal for fastidious cable management, keeping them neat and reducing wear. Correctly anchoring your cables prevents future faults resulting from sagging or kinking, which can degrade the performance of your installed network. Ensuring the cabling stays organized can significantly simplify future maintenance and network expansions.
Cutting the cables to length and attaching connectors require precision. Use high-quality RJ45 connectors and a crimping tool to terminate the cables. Remember to follow wiring standards, either T568A or T568B, when attaching connectors, as mixing standards can lead to connectivity issues. Testing each cable run using a cable tester before sealing walls or painting certifies that the network is functioning correctly, pre-empting costly repairs later.
To close the installation, fit wall plates where cables emerge, for a tidy, professional finish. These plates cover holes, providing a base for keystone jacks that vehicles connect to devices like routers, modems, or computers. If you require additional connections beyond simple wall sockets, a patch panel installation might be beneficial. Install patch panels and network switches after cables are run, offering easier management and customization as your network grows.
By following these steps, you enhance connectivity across your home naturally and efficiently. The effort involved in careful installation pays off with a robust, high-speed network ready to meet current and future digital demands. Remember that good preparation, proper tools, and careful execution make the installation process seamless and improve the overall quality and durability of your ethernet setup.
Troubleshooting Common Ethernet Problems
Encountering issues in your home Ethernet network can be frustrating, but understanding and troubleshooting these common problems can save a lot of time and effort. From connectivity issues with your router to setting up a backup connection for stability, addressing these challenges ensures your network runs smoothly. Let’s delve into understanding these potential pitfalls and how to rectify them for a seamless home connectivity experience.
Understanding Connectivity Issues with Your Router
Understanding and resolving connectivity issues can be the key to maintaining your home’s network stability. Connectivity problems often start at the heart of your network, the router. The router serves as the central hub, distributing internet signals throughout your home via Ethernet cables and WiFi. When problems arise, the first step in troubleshooting should be focused on the router itself. Power cycling the router, a simple method involving turning the router off, waiting a few seconds, and then restarting it, can resolve many common issues. This process allows the router to reset, clearing temporary caches and errors that could be affecting connectivity.
Another root cause of connectivity issues lies in outdated firmware. Ensuring your router’s firmware is up-to-date is essential as manufacturers continually release updates that address security vulnerabilities and enhance performance. Regular checks for new firmware can prevent potential connectivity disruptions and ensure compatibility with new devices or Ethernet standards. Accessing the router’s settings through its IP address allows you to perform updates seamlessly.
The physical setup of your router also plays a significant role in network performance. If your router is located in a corner or enclosed area, this can degrade its ability to broadcast a strong signal. For Ethernet connections, while WiFi strength may seem irrelevant, a poor initial signal can affect the router’s overall performance. Experiment with the router placement, preferably in a central, elevated location free from obstructions like walls or large furniture. This set-up can mitigate connectivity issues and extend the range of both Ethernet and WiFi networks within your home.
Compatibility issues can also arise due to mismatched standards between your router and Ethernet cables. Ensure that your router supports the same Ethernet category as your cables, whether it’s Cat5e, Cat6, or Cat6a. This harmony prevents bottlenecks and ensures optimal performance. Ethernet cables are often shielded to protect against electromagnetic interference, which is particularly crucial if your home is equipped with many electronic devices. When troubleshooting, double-check cable connections to confirm they are secure, as an improperly seated cable can mimic connection issues.
Finally, to address issues proactively, consider implementing network-monitoring tools that can alert you to potential network problems, such as unexpected traffic spikes or suspicious devices attempting to connect. Such tools provide insights into the health of your network, allowing for prompt action before minor issues escalate. By taking these steps, you can significantly improve your router’s performance and, by extension, the stability of your home Ethernet network.
| Problem Area | Solution Approach | Key Considerations |
| Connectivity Drops | Check cable connections and replace faulty cables | Ensure proper seating of cables; consider cable quality |
| Slow Speeds | Test network performance and update firmware | Evaluate ISP bandwidth and device capabilities |
| Intermittent Signal | Reset devices and check for interference sources | Assess router placement and distance to devices |
| Unrecognized Device | Verify network settings and reboot devices | Confirm MAC address filtering and device compatibility |
This table provides an at-a-glance guide to resolving common Ethernet issues, ensuring stable and efficient home network performance.
How to Set Up a Back-up Connection to Ensure Stability
Ensuring your home’s network stability can often mean setting up a robust backup connection. A backup Ethernet network offers seamless transition capabilities in scenarios where the primary connection fails, reducing downtime and frustration. Establishing a backup setup involves strategic planning, equipment procurement, and configuration to ensure an automatic switch-over when necessary.
The first step in setting up a backup connection is choosing an alternative ISP (Internet Service Provider) or connection method. This could mean using a different ISP entirely or opting for a cellular data backup through a modem or a 4G/5G gateway. The redundancy of different connection types ensures that your network remains operational despite ISP issues or physical line disturbances. Once decided, you must install the secondary connection hardware alongside your existing setup.
Integrating a dual-WAN router is a common method of managing a backup connection effectively. This type of router supports multiple internet connections simultaneously, balancing, or prioritizing traffic according to specific needs. It automatically switches between connections should one line fail, providing users with uninterrupted internet access. Such routers are typically configured to automatically detect when the primary connection is offline, switching to the secondary path without any manual intervention.
For Ethernet-focused setups, you must also think about the physical networking equipment. Supporting a backup line means duplicating equipment such as cables and splitters. Ensure these components are as high-quality as those used for the primary connection to maintain reliability. If your house relies heavily on connectivity, consider configuring a backup network that includes its own set of cabling and possibly a secondary switch to distribute this connection efficiently.
In practice, setting up your home to handle network failovers involves configuring the router’s settings to handle dynamic DNS and port forwarding for both connections. This setup maintains operational consistency for different devices, from PCs and smart TVs to IoT devices. A tightly-configured network minimizes the risk of disruptions during the transition between primary and secondary connections.
Testing your backup connection is as crucial as setting it up. Regular tests ensure that the failover process works seamlessly and can highlight any potential issues, such as software updates that might have disrupted the configuration. Once configured, maintaining a schedule for periodically switching to the backup connection can help verify that it remains functional. This proactive approach ensures your network is always ready to meet the needs of a modern digital household, maintaining constant connectivity and adding a layer of resilience to your home’s Ethernet setup.
To continue enhancing your home network setup, consider these practical tips for optimizing and maintaining your backup connection effectively:
- Schedule regular tests to ensure seamless failover functionality.
- Document router configurations for both primary and backup connections.
- Update all networking equipment firmware regularly.
- Invest in UPS devices to protect against power outages.
- Monitor network performance with diagnostic tools to identify issues.
- Educate household members on basic troubleshooting steps.
- Maintain a list of ISP support contacts for quick access.
These steps will help keep your network stable and responsive at all times.
Installing home Ethernet is an empowering step toward enhancing your digital experience. With clear guidelines and easy step-by-step processes, homeowners can confidently establish a reliable network that supports all their connected devices. The investment in Ethernet offers unparalleled speed, stability, and security, making it an ideal solution for the modern household. Whether it’s for seamless work-from-home setups or uninterrupted gaming sessions, Ethernet installation is a valuable upgrade. For further assistance, consider consulting professional installers or exploring additional resources, ensuring your home network is both robust and efficient. Take the plunge and enjoy superior connectivity today.
FAQs
What are the benefits of installing home Ethernet over Wi-Fi?
Installing home Ethernet offers enhanced stability, faster speeds, and a more reliable network compared to Wi-Fi. It minimizes latency, reduces interference, and provides consistent connectivity, ideal for activities like streaming, gaming, and video conferencing.
What tools are required for setting up an Ethernet network at home?
Essential tools for setting up an Ethernet network include Ethernet cables (preferably Cat6 or higher), RJ45 connectors, a crimping tool, a cable tester, and keystone jacks. Additional tools like drills, patch panels, and data switches may be necessary for larger setups.
How does Ethernet installation impact the security of my home network?
Ethernet networks enhance security by reducing the risk of unauthorized access, as wired connections are harder to intercept than wireless signals. This adds an extra layer of protection, especially beneficial for those handling sensitive data or operating a smart home.
Can installing Ethernet increase the market value of a property?
Yes, homes with Ethernet installations are more attractive to buyers, as they feature robust, up-to-date technology infrastructure. This setup is especially appealing in a market where fast and reliable connectivity is increasingly valuable.
What is the role of keystone jacks in an Ethernet network?
Keystone jacks are crucial for Ethernet installations as they allow cable termination at wall outlets, providing neat and organized connection points throughout the home. They simplify network expansion and maintenance by enabling easy reconfiguration without extensive rewiring.